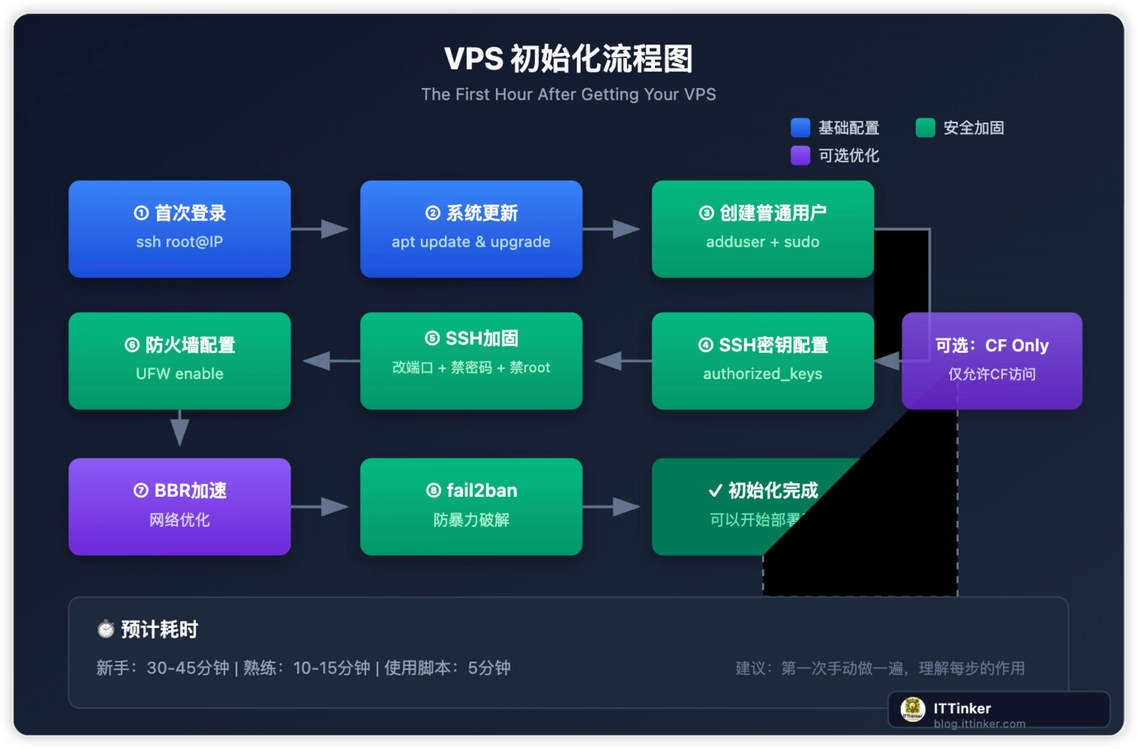
结论先行:Ubuntu LTS 是主流云厂商默认预装率最高的 Linux 发行版,但出厂默认镜像包含大量后台自动任务与交互式机制。若直接上线,容易遭遇 needrestart 锁死自动化脚本、Snap 占用内存与 Loop 设备、以及 Canonical 广告提示刷屏等问题。必须在开箱第一时间完成三大核心任务:关闭交互式更新弹窗并精简后台后台服务、配置独立的 Sudo 账号与 Ed25519 密钥认证、通过 Netplan、UFW 防火墙与 BBR 构建高性能防御基线。
0、Ubuntu 与 Debian 的生产运维差异
Ubuntu 基于 Debian 不稳定分支(Sid)衍生,但在运维习惯上与 Debian 存在明显不同:
| 维度 |
Debian 12 (Bookworm) |
Ubuntu 22.04 / 24.04 LTS |
生产运维应对建议 |
| 网络配置体系 |
/etc/network/interfaces |
/etc/netplan/*.yaml |
Ubuntu 必须使用 Netplan YAML 格式修改静态 IP 与 DNS |
| 包更新机制 |
传统 apt,更新提示温和 |
预装 needrestart,弹窗打断批量脚本 |
初始化必须将 needrestart 改为自动批处理模式 |
| 软件格式 |
纯 APT / Deb,提倡轻量 |
深度集成 Snap,开机挂载大量 loop 设备 |
生产服务器若无特需,可停用 snapd 节省内存与磁盘 |
| DNS 解析 |
/etc/resolv.conf 直连 |
systemd-resolved 本地 stub 监听 (127.0.0.53) |
排查 DNS 问题需通过 resolvectl status 查询真实上游 |
| 商业提示 |
纯开源无推广 |
登录 MOTD 默认注入 Ubuntu Pro / ESM 广告 |
清理 /etc/update-motd.d/ 保持终端纯净 |
1、开箱急救:屏蔽交互弹窗与系统瘦身
在全新的 Ubuntu 实例上执行 apt upgrade 时,常被粉紫色的全屏 needrestart 交互界面卡住,导致自动化脚本无法继续执行。
1.1 禁用 needrestart 交互式弹窗
执行以下指令,配置 needrestart 在内核或库更新后自动在后台重启服务,不再阻断终端会话:
1
2
3
4
5
|
sudo sed -i "s/#\$nrconf{restart} = 'i';/\$nrconf{restart} = 'a';/g" /etc/needrestart/needrestart.conf
echo 'DEBIAN_FRONTEND="noninteractive"' | sudo tee -a /etc/environment
|
1.2 清理 Ubuntu MOTD 登录广告与无用提示
每次通过 SSH 登录 Ubuntu 时,系统都会输出很长的一段推广文字,不仅降低连接效率,还会干扰日志捕获。通过调整权限即可将其关闭:
1
2
3
4
5
6
7
8
|
sudo chmod -x /etc/update-motd.d/10-help-text 2>/dev/null || true
sudo chmod -x /etc/update-motd.d/50-motd-news 2>/dev/null || true
sudo chmod -x /etc/update-motd.d/88-esm-announce 2>/dev/null || true
sudo chmod -x /etc/update-motd.d/91-contract-ua-esm-status 2>/dev/null || true
sudo systemctl disable --now motd-news.timer 2>/dev/null || true
|
1.3 评估并停用 Snap 守护进程(可选但推荐)
在 1GB 或 2GB 内存的小型 VPS 上,snapd 会常驻消耗 150MB 以上内存,且会在 df -h 中产生大量 /dev/loopX 虚拟块设备挂载,增加排查难度。对于跑后端 API 或 Docker 的纯服务端,可完整卸载 Snap:
1
2
3
4
5
6
7
8
9
10
11
12
13
14
|
snap list
sudo snap remove --purge lxd core20 snapd 2>/dev/null || true
sudo apt purge snapd -y
sudo rm -rf /root/snap /home/*/snap /var/cache/snapd/
sudo tee /etc/apt/preferences.d/nosnap.pref << 'EOF'
Package: snapd
Pin: release a=*
Pin-Priority: -10
EOF
|
2、系统全量更新与基础工具整备
完成基础清理后,开始同步 Ubuntu 官方安全补丁并安装基础排障套件。
1
2
3
4
5
6
7
8
9
10
11
|
sudo apt update && sudo apt full-upgrade -y
sudo apt install -y \
curl wget git vim tmux htop iotop \
net-tools dnsutils ufw fail2ban \
chrony ca-certificates gnupg jq
sudo apt autoremove -y && sudo apt autoclean
|
时钟同步对于分布式服务、JWT Token 校验与数据库主从同步具有决定性作用。通过 chrony 保证服务器时钟精度:
1
2
3
4
5
6
|
sudo timedatectl set-timezone Asia/Shanghai
sudo systemctl enable --now chrony
chronyc tracking
|
3、系统分层安全加固矩阵
加固流程遵循“外防扫描、内做隔离、自动巡检”的分层防御策略:
4、账户权限隔离与 SSH 密钥认证加固
4.1 创建低权限运维账号并配置 Sudo
1
2
3
4
5
|
sudo adduser --gecos "" ittinker
sudo usermod -aG sudo ittinker
|
4.2 配置 Ed25519 密钥认证
在本地工作机生成密钥对(已有时可复用):
1
| ssh-keygen -t ed25519 -C "admin@ittinker.com" -f ~/.ssh/id_ed25519_ubuntu
|
在 Ubuntu 服务器上导入公钥并设置属主与权限:
1
2
3
4
5
6
7
8
9
10
| sudo -u ittinker mkdir -p /home/ittinker/.ssh
sudo -u ittinker touch /home/ittinker/.ssh/authorized_keys
echo "ssh-ed25519 AAAAC3NzaC1lZDI1NTE5AAAAI... admin@ittinker.com" | sudo -u ittinker tee -a /home/ittinker/.ssh/authorized_keys > /dev/null
sudo chmod 700 /home/ittinker/.ssh
sudo chmod 600 /home/ittinker/.ssh/authorized_keys
sudo chown -R ittinker:ittinker /home/ittinker/.ssh
|
4.3 强化 SSHD 守护进程配置
Ubuntu 22.04 与 24.04 默认使用 /etc/ssh/sshd_config.d/ 目录加载独立片段,创建 /etc/ssh/sshd_config.d/60-production-hardening.conf:
1
2
3
4
5
6
7
8
9
10
11
12
13
14
15
16
17
18
19
20
21
22
23
24
| sudo tee /etc/ssh/sshd_config.d/60-production-hardening.conf << 'EOF'
Port 22222
PubkeyAuthentication yes
AuthorizedKeysFile .ssh/authorized_keys
PasswordAuthentication no
PermitEmptyPasswords no
PermitRootLogin no
LoginGraceTime 30
MaxAuthTries 3
ClientAliveInterval 300
ClientAliveCountMax 2
X11Forwarding no
EOF
|
测试配置文件语法无误后,重载服务:
1
| sudo sshd -t && sudo systemctl restart ssh
|
安全警告:在确认新端口能通过密钥成功登录前,不要退出当前的 SSH 窗口!打开新终端窗口验证:
ssh -i ~/.ssh/id_ed25519_ubuntu -p 22222 ittinker@<服务器IP>
5、Netplan 网络配置与 DNS 解析调优
在 Ubuntu 中,如果直接修改 /etc/resolv.conf,会在网络重载或系统重启后被 systemd-resolved 强行覆盖。正确的修改路径是维护 Netplan 配置。
5.1 查看当前 Netplan 配置文件
5.2 规范化配置静态 DNS 与网络参数
以编辑 /etc/netplan/01-netcfg.yaml 为例:
1
2
3
4
5
6
7
8
9
10
11
| network:
version: 2
renderer: networkd
ethernets:
eth0:
dhcp4: true
nameservers:
addresses:
- 1.1.1.1
- 8.8.8.8
- 2606:4700:4700::1111
|
执行语法检查与应用:
1
2
3
4
5
|
sudo netplan generate
sudo netplan apply
|
通过 resolvectl status 查看当前正在工作的全局与网卡级 DNS 上游服务器列表。
6、内核网络调优与 Swap 策略
6.1 开启 Google BBR 算法
编辑 /etc/sysctl.d/99-network-tuning.conf:
1
2
3
4
5
6
7
8
9
10
11
12
13
14
15
16
| sudo tee /etc/sysctl.d/99-network-tuning.conf << 'EOF'
net.core.default_qdisc = fq
net.ipv4.tcp_congestion_control = bbr
net.core.somaxconn = 65535
net.ipv4.tcp_max_syn_backlog = 8192
fs.file-max = 1000000
vm.swappiness = 10
vm.vfs_cache_pressure = 50
EOF
sudo sysctl --system
|
6.2 创建 2GB 生产保护型 Swap 分区
如果 VPS 内存较小(如 1G 或 2G),偶尔遇到编译或突发流量时极易被 Linux OOM Killer 杀掉关键进程。通过 fallocate 创建 Swap 文件可提供缓冲保护:
1
2
3
4
5
6
7
8
9
10
11
12
13
14
15
16
17
|
sudo fallocate -l 2G /swapfile
sudo chmod 600 /swapfile
sudo mkswap /swapfile
sudo swapon /swapfile
echo '/swapfile none swap sw 0 0' | sudo tee -a /etc/fstab
free -h
|
7、UFW 防火墙与自动安全补丁配置
7.1 配置 UFW 防火墙
1
2
3
4
5
6
7
8
9
10
11
12
13
14
|
sudo ufw default deny incoming
sudo ufw default allow outgoing
sudo ufw allow 22222/tcp comment 'Custom SSH'
sudo ufw allow 80/tcp comment 'HTTP'
sudo ufw allow 443/tcp comment 'HTTPS'
sudo ufw enable
sudo ufw status verbose
|
7.2 配置 unattended-upgrades 自动化安全修补
生产环境需要定期修复高危 CVE,但又不能因为自动大版本升级破坏现有软件依赖。unattended-upgrades 可以精准配置只下载并安装带有“安全补丁”标识的包:
1
2
3
4
| sudo apt install -y unattended-upgrades update-notifier-common
sudo dpkg-reconfigure -plow unattended-upgrades
|
调整 /etc/apt/apt.conf.d/50unattended-upgrades:
1
2
3
4
5
6
7
8
9
10
| Unattended-Upgrade::Allowed-Origins {
"${distro_id}:${distro_codename}-security";
};
// 自动移除不再需要的旧依赖(相当于 autoremove)
Unattended-Upgrade::Remove-Unused-Kernel-Packages "true";
Unattended-Upgrade::Remove-Unused-Dependencies "true";
// 发生更新后若需要重启,不自动强制重启,防止业务意外下线
Unattended-Upgrade::Automatic-Reboot "false";
|
8、结合开源脚本实现标准化交付
为了避免在多台机器上重复手工敲打上述长命令,可以借助开源工具仓库 ittinker-scripts 中的模块完成一键交付:
1
2
3
4
5
6
7
8
|
git clone https://github.com/Richardson/ittinker-scripts.git /opt/ittinker-scripts
sudo bash /opt/ittinker-scripts/vps-init/run.sh
sudo bash /opt/ittinker-scripts/ssh-key-setup/run.sh
|
9、初始化验收清单
完成加固后,对照以下清单逐一执行验证: